Quick overview/short answer: To cut a laminate countertop, use a circular saw with a fine-tooth carbide blade for long straight cuts, or a jigsaw for sink cutouts and curves.
Always cut with the finished face down when using a circular saw, because the blade cuts on the upstroke, and chipout happens at the top of the cut. Apply masking tape along the cut line to reduce splintering, support the offcut so it doesn’t tear away, and use a straightedge guide to keep the line true.
Introduction
Laminate is one of the more forgiving countertop materials to work with. It’s lighter than stone, easier to maneuver, and doesn’t require specialized equipment. But it has one quirk that catches people off guard: cut it the wrong way, and you get chipping along the edge that’s hard to fix after the fact.
Clean cuts are completely achievable with standard tools. The technique just needs to match the type of cut you’re making.
In this post, we’ll walk through the four main methods for cutting laminate countertops, when to use each one, and the precautions that make the difference between a clean edge and a ragged one.
What Tools Can You Use to Cut Laminate?
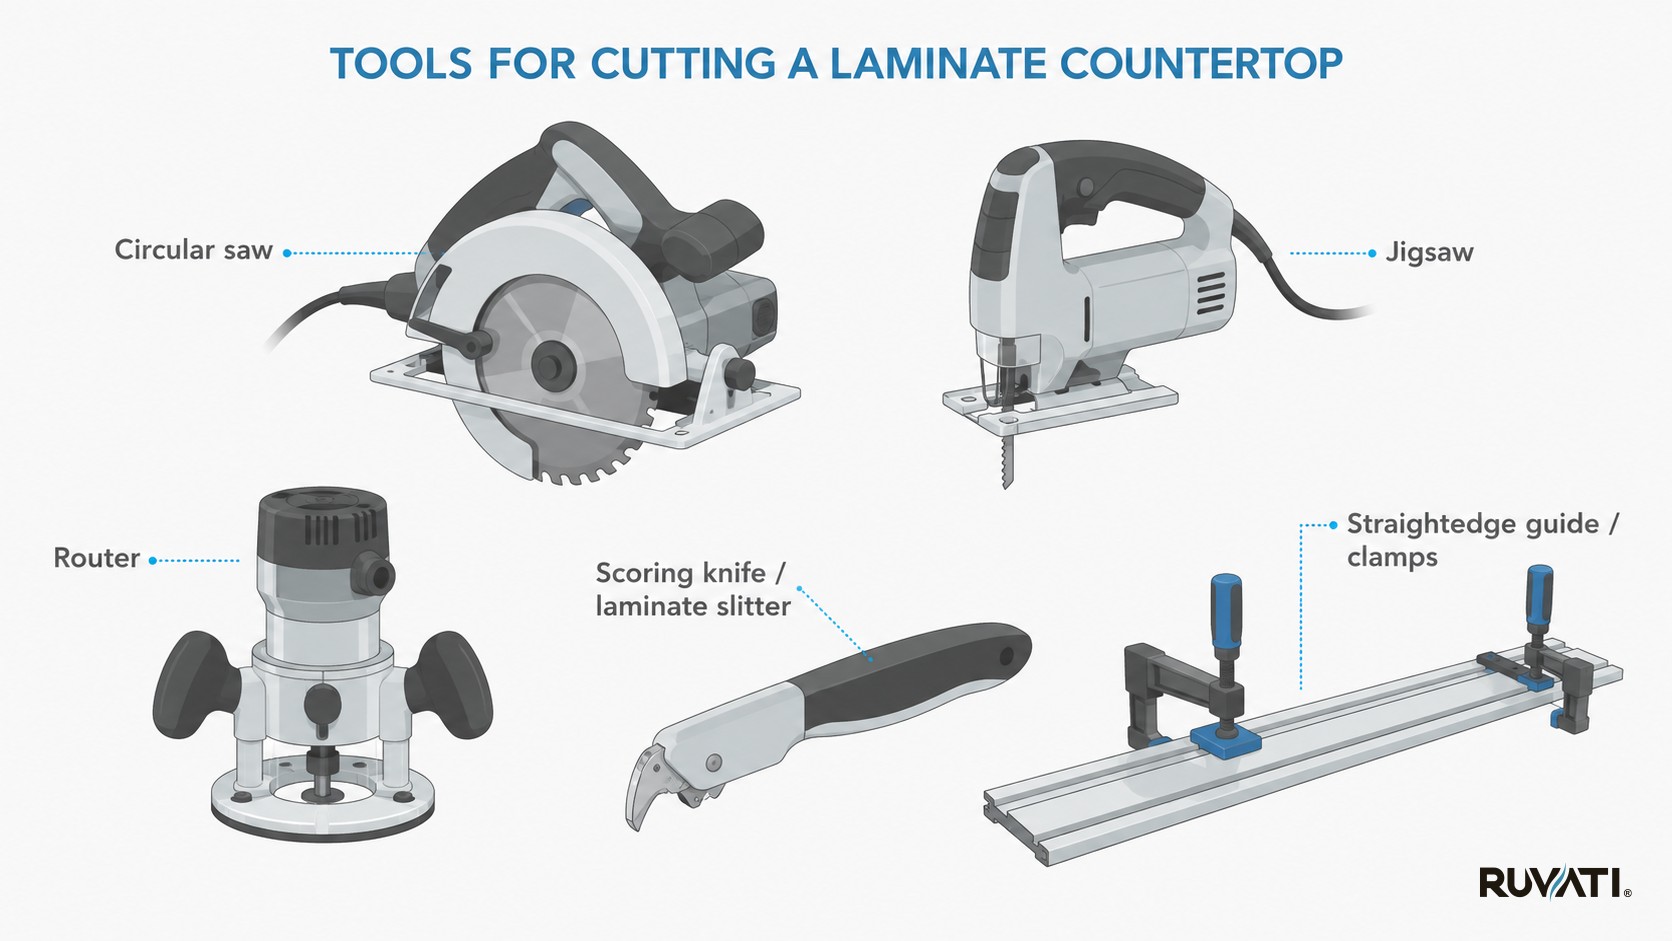
Before we get into the step-by-step guide, here is an overview of the various tools that you can use to cut laminate.
- Circular saw. The go-to for long straight cuts, like trimming a countertop to length or cutting it to fit against a wall. Fast, accurate with a guide, and handles post-form countertops well.
- Jigsaw. The right tool for sink cutouts and any curved or irregular cut. Slower than a circular saw but far more maneuverable.
- Router. Not a primary cutting tool, but essential for trimming laminate sheet that’s been glued to a substrate. Gets the edge flush and clean after the laminate has been applied.
- Scoring knife / laminate slitter. For thin, raw laminate sheets before they’re applied to a substrate. Good for narrow strips and small adjustments, no power tools needed.
Blade choice matters regardless of the tool. Always use a fine-tooth blade, at least 80 to 100 teeth on a circular saw blade, and a downstroke or reverse-tooth blade on a jigsaw. Carbide-tipped teeth hold their edge and produce cleaner cuts on laminate than standard steel.
Method 1: Circular Saw
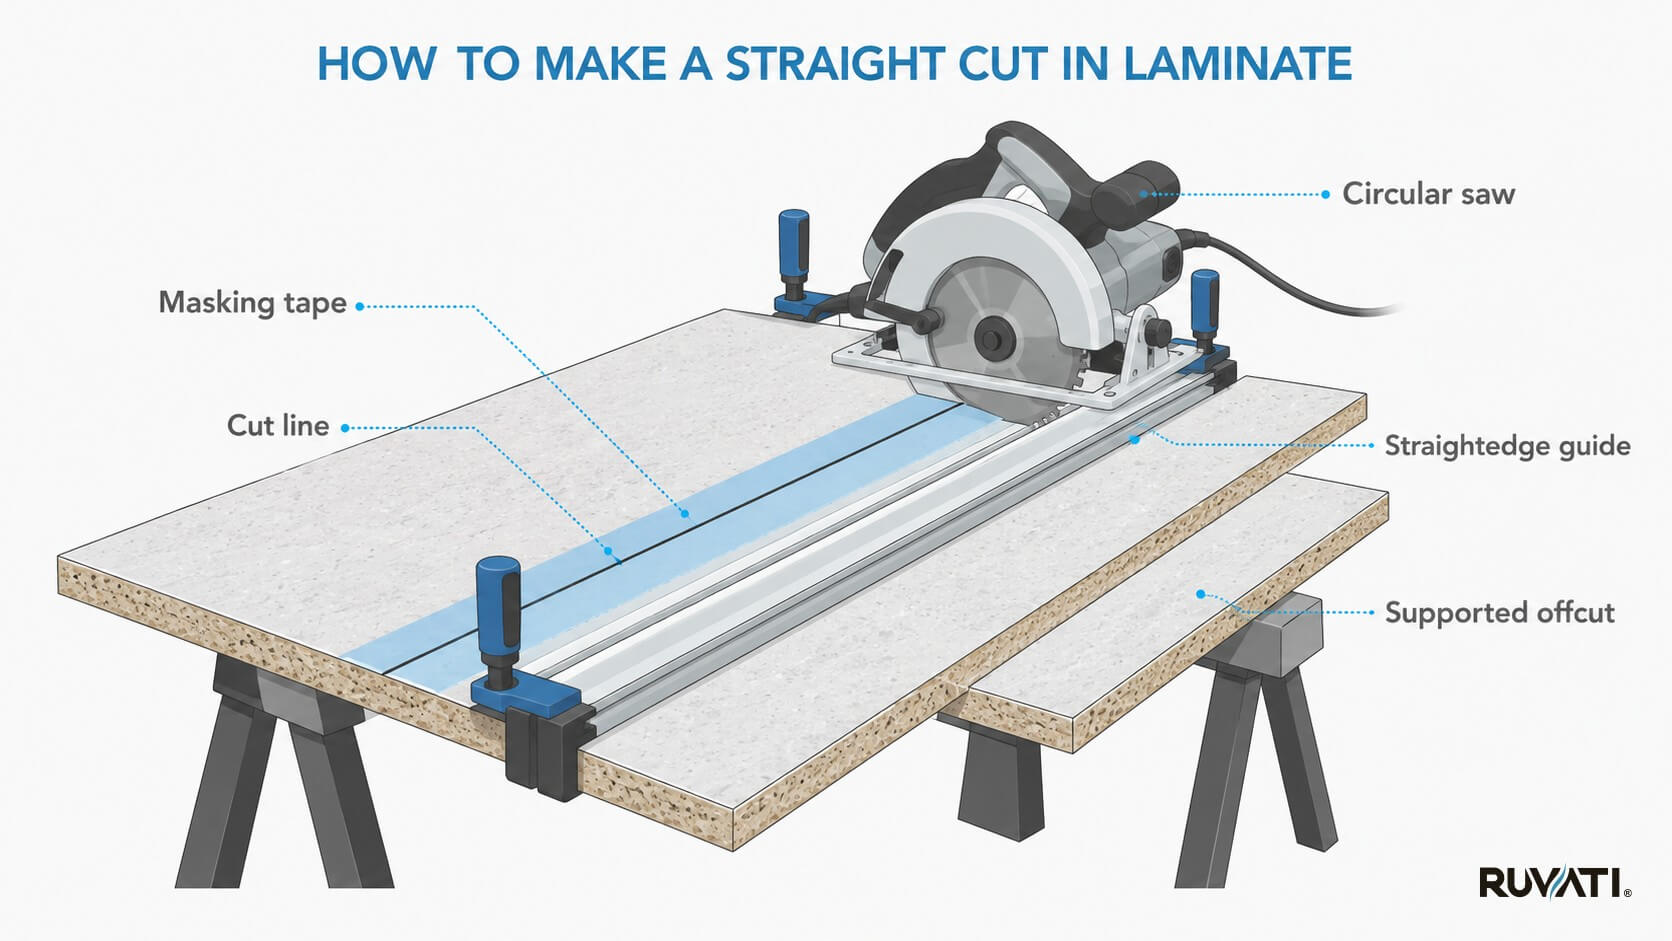
Here is what you need to do:
- Mark your cut line clearly on the countertop with a pencil or chalk line.
- Apply a strip of masking tape directly over and along the cut line on the finished (top) surface. This reduces chipout on the face that matters.
- Set up a straightedge guide or clamp a long level to the countertop as a fence. Freehand cuts on laminate rarely come out clean.
- Flip the countertop face-down before cutting. This is the critical step. Circular saw blades cut on the upstroke, which means chipout happens at the top of the cut. With the countertop face-down, the finished surface is where the blade exits, not where it enters, so chipout ends up on the underside.
- Set the blade depth to just slightly more than the thickness of the countertop. There’s no benefit to having the blade extend further than it needs to.
- Run the saw steadily along the guide. Don’t rush the feed rate. Let the blade do the work.
- Support the offcut piece throughout the cut so it doesn’t sag and tear away before the cut is complete.
Example of a situation where this method is suitable.
A post-form countertop, the kind with a built-in curved backsplash and a rounded front edge, almost always needs to be trimmed to length before installation. This is a straight end cut, and the circular saw handles it cleanly and quickly with a guide in place.
Precautions for this method.
- Always cut face-down. This is the most common mistake when cutting laminate with a circular saw, and the chipout it causes on the finished surface can’t be undone.
- Clamp the countertop securely before cutting. It needs to be stable on sawhorses or a workbench, and the offcut side needs support so it doesn’t drop.
- Keep the masking tape in place until after the cut. Remove it slowly and pull at a low angle, because yanking it off can lift small chips of laminate near the cut edge.
- Wear eye protection. Laminate chips travel fast.
Method 2: Jigsaw
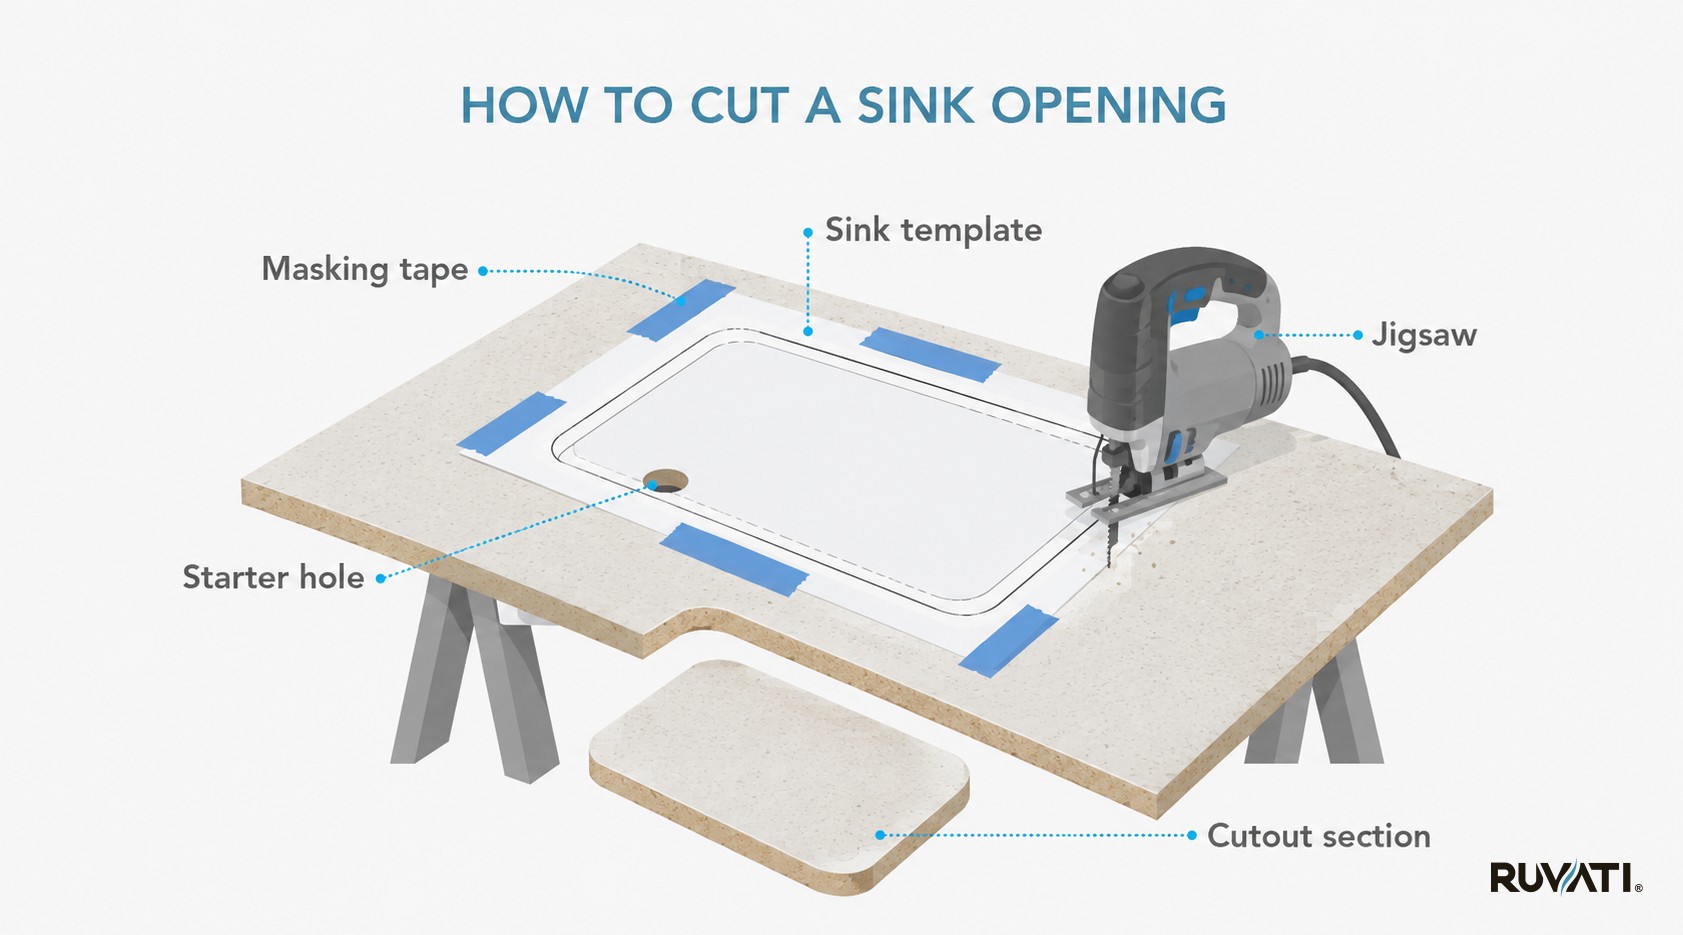
A jigsaw is the right tool any time the cut isn’t a straight line, most commonly when cutting out the opening for an undermount or drop-in sink. It’s slower than a circular saw but gives you the control to follow curves and change direction mid-cut.
Here is what you need to do:
- Mark the sink cutout using the template that came with your sink. Most manufacturers include a paper or cardboard template in the box for this purpose. Tape it to the countertop surface and trace the outline.
- Apply masking tape along the cut line on the finished surface.
- Drill a starter hole inside the cutout area, large enough to fit the jigsaw blade, at each corner of the outline. This gives you an entry point for the blade.
- Use a downstroke or reverse-tooth jigsaw blade. Standard jigsaw blades cut on the upstroke, which means chipout on the top surface. A downstroke blade keeps the finished face clean.
- Insert the blade into a starter hole and follow the outline at a slow, steady feed rate. Let the blade reach full speed before advancing.
- Have a helper support the cutout piece as you near the end of the cut so it doesn’t drop and crack the countertop along the cut line.
Example of a situation where this method is suitable.
Cutting the sink opening in a laminate countertop is the classic use case for a jigsaw. The corners of the cutout are typically rounded, which a circular saw can’t navigate, and the opening is too large for a router to handle in one pass. The jigsaw follows the template precisely and handles the full perimeter of the cutout.
Precautions for this method.
- Use a downstroke blade. A standard upstroke jigsaw blade will chip the finished surface badly on laminate, and the damage is irreversible.
- Keep the feed rate slow and consistent. Rushing causes the blade to wander from the line and increases chipout.
- Don’t start a cut without a drilled starter hole. Trying to plunge-cut into laminate with a jigsaw blade risks cracking the surface.
- Double-check the template orientation before cutting. Sink cutout positions are rarely centered, so make sure the template is aligned correctly for your faucet holes and the cabinet below.
Method 3: Router
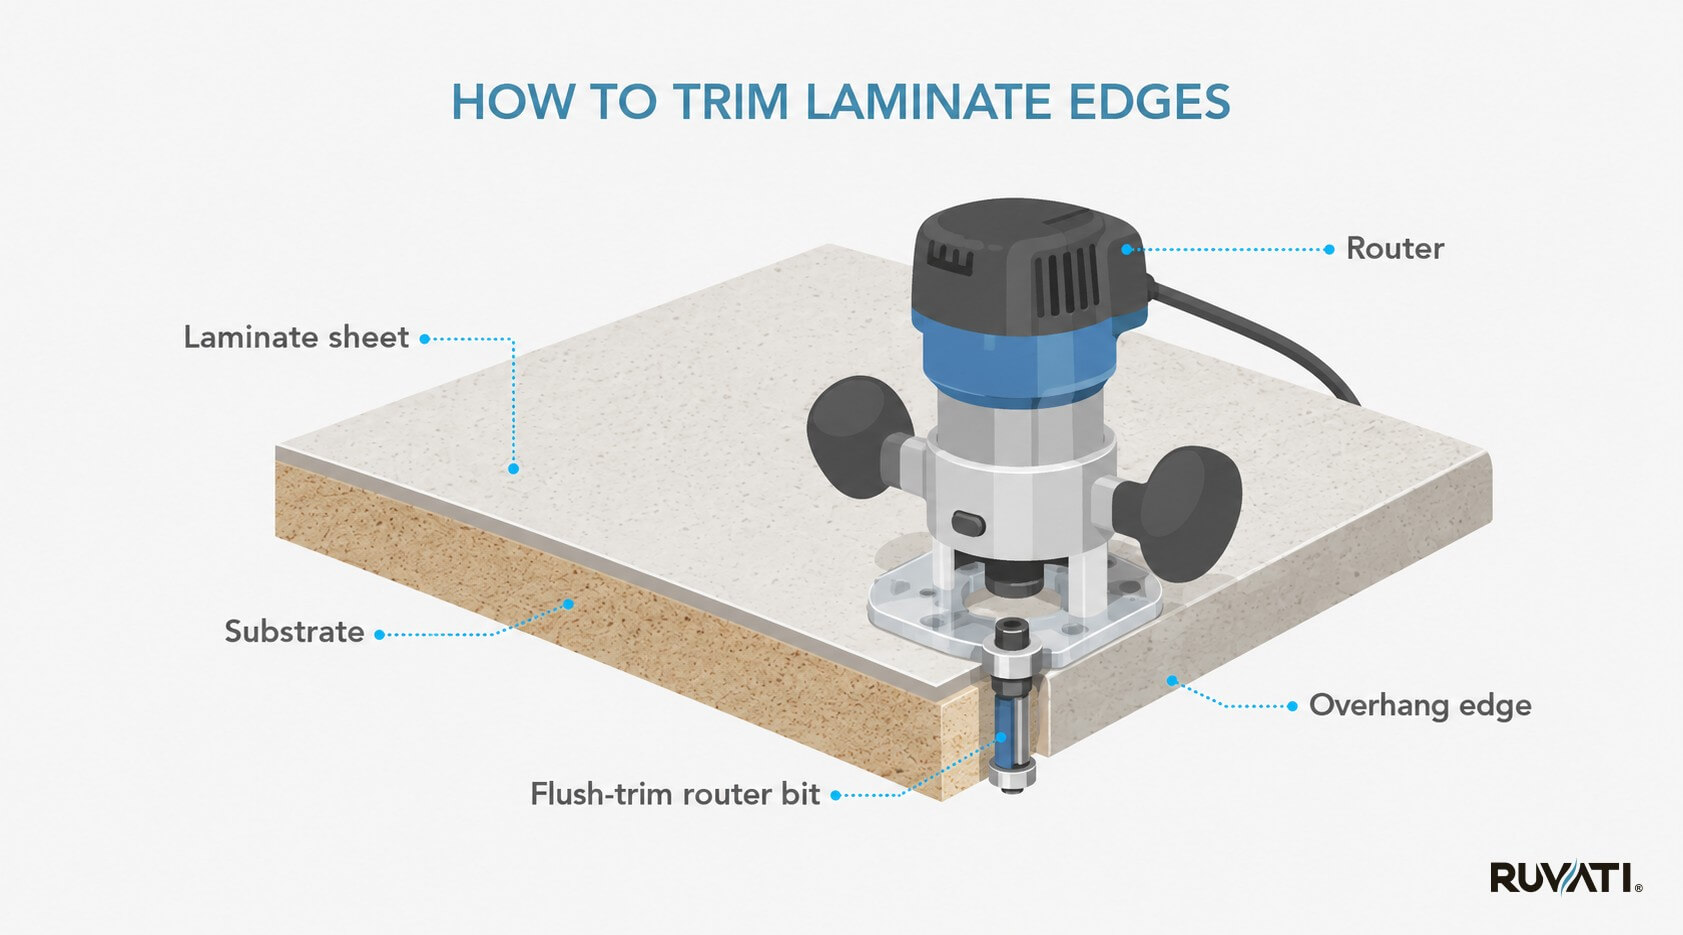
A router isn’t used to make the primary cut in a laminate countertop. Its job is trimming, specifically cleaning up the edge of the laminate sheet after it’s been glued to a substrate like MDF or particleboard. When you apply laminate to a surface with contact cement, there’s always a small overhang along the edges. A flush-trim router bit removes that overhang and leaves a perfectly even edge.
Here is what you need to do:
- Allow the contact cement to cure fully before routing. Routing over fresh adhesive gums up the bit.
- Install a flush-trim bit in the router. This bit has a bearing at the tip that rides along the substrate edge while the cutting flutes trim the overhanging laminate flush.
- Set the router so the bearing contacts the substrate edge, and the bit is aligned with the surface.
- Move the router in the correct direction: left to right when facing the edge, against the rotation of the bit. Routing in the wrong direction causes the bit to grab and chip instead of shear cleanly.
- Make the pass in a single smooth movement. Stopping mid-pass can leave a slight mark on the edge.
Example of a situation where this method is suitable.
When laminating a countertop from scratch, applying sheet laminate to a substrate, and building up the edge with laminate strips, the router is what makes the edges clean and professional. After gluing the top sheet down and pressing it flat, the router trims the overhang on all four sides in a few passes.
Precautions for this method.
- Always move the router against the bit rotation, not with it. Climb-cutting causes the tool to pull forward and lose control.
- Keep the bearing firmly in contact with the substrate edge throughout the pass. Lifting off even briefly causes the bit to cut deeper than intended.
- Use a sharp bit. A dull flush-trim bit tears the laminate edge instead of shearing it cleanly.
Method 4: Scoring Knife / Laminate Slitter
For cutting raw laminate sheet before it goes onto a substrate, a scoring knife is often all you need. This method works well for narrow strips, small trim pieces, and situations where setting up a saw isn’t worth the effort.
Here is what you need to do:
- Place the laminate sheet face-up on a flat work surface.
- Clamp a straightedge along the cut line.
- Score along the straightedge firmly with a laminate scoring knife or a sharp utility knife. You’re not trying to cut all the way through. You’re cutting a deep groove into the top surface of the laminate.
- Score the line three to five times, pressing harder with each pass.
- Slide the scored line to the edge of the workbench so the waste side overhangs. Apply firm downward pressure on the waste side, and the laminate will snap cleanly along the scored line.
- Clean up the edge lightly with a fine file if needed.
Example of a situation where this method is suitable.
Cutting laminate edge banding to width, or trimming a small piece of sheet laminate for a patch or repair, is where the scoring knife earns its place. For these tasks, setting up a saw is more work than it’s worth. Score and snap is fast, requires no power, and produces a serviceable edge.
Precautions for this method.
- This method only works reliably on thin, unattached laminate sheets, not on a post-form countertop or laminate that’s already bonded to a thick substrate.
- Score the line firmly and repeatedly. A shallow score produces a ragged snap instead of a clean one.
- Keep your fingers well clear of the knife and away from the snap line. Laminate edges are sharp immediately after snapping.
Tips for Clean Cuts Every Time
Regardless of the method that you choose to cut the laminate countertop, there are a few tips that you can follow to make sure your cut is clean every time.
Here are some things that you can remember.
- Masking tape is your best friend. Running a strip of tape over the cut line before you mark it, then marking on top of the tape, reduces chipout noticeably on all power tool methods. Remove it carefully after the cut.
- Sharp blades only. A dull blade generates more friction, more heat, and more chipping than a sharp one. If the blade has been used for other cutting tasks, swap it out before cutting laminate.
- Support the offcut. This comes up with every method because it matters every time. An unsupported offcut drops before the cut is fully complete, and the last inch or two tears instead of separating cleanly.
- Measure the countertop in place. Laminate countertops need to fit within a fraction of an inch. Measure the final installed length at both the front and back of the countertop run, because walls are rarely perfectly square, and a few millimeters of difference can mean a visible gap.
Common Mistakes to Avoid When Cutting Laminate Countertops
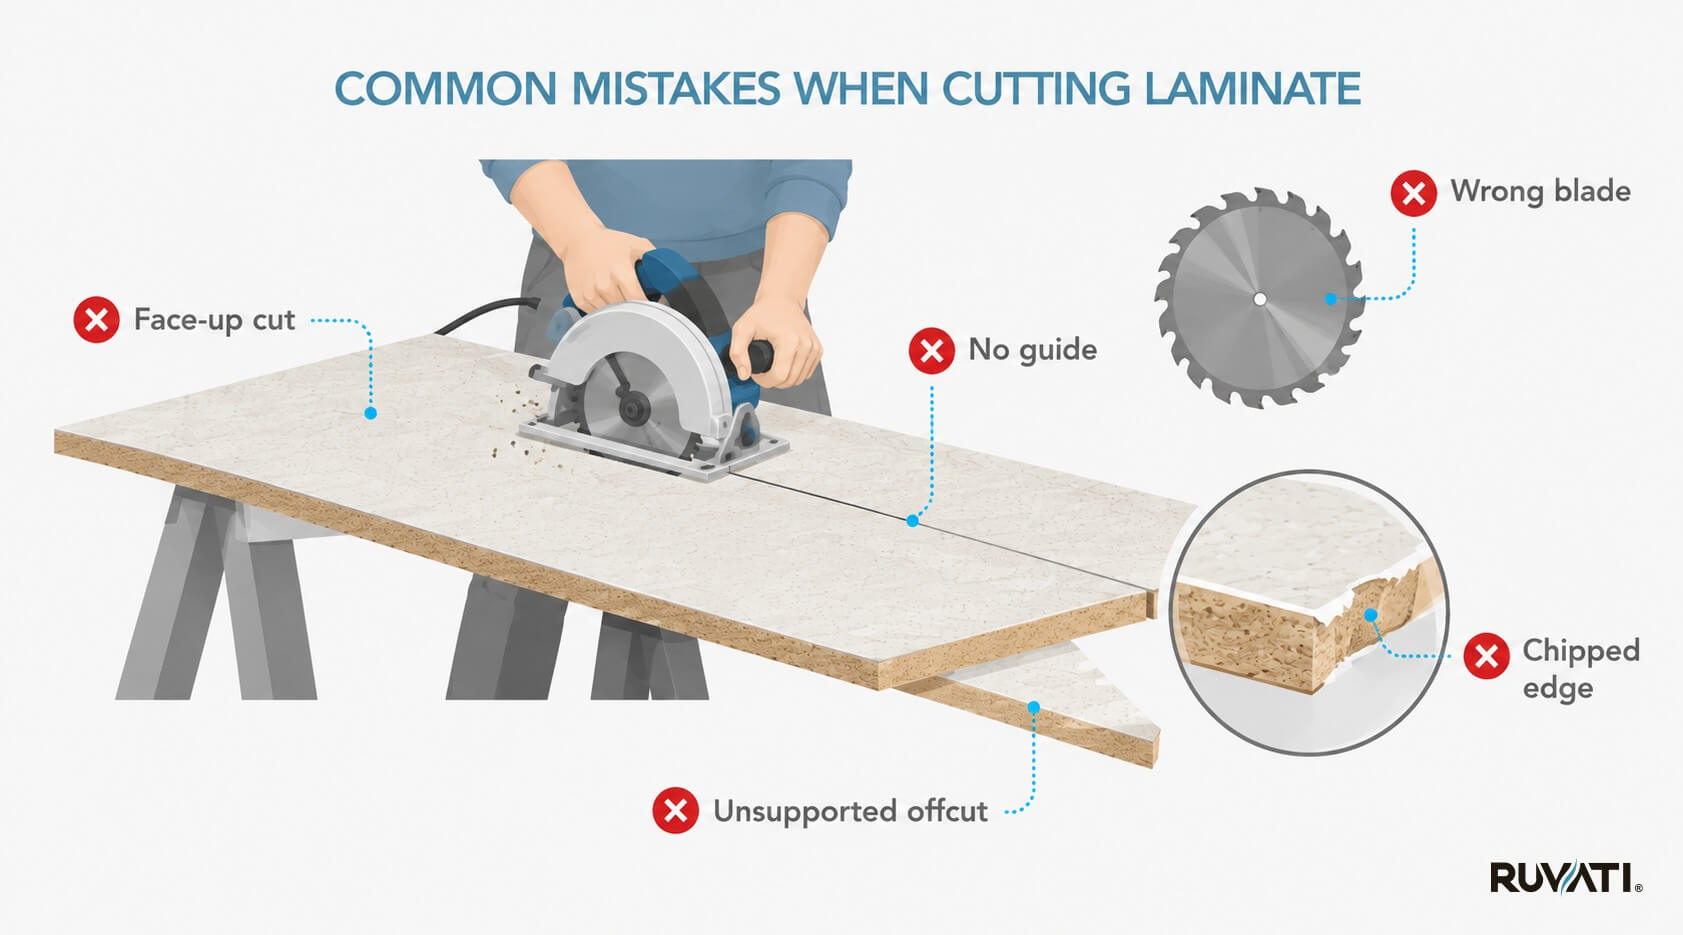
Just as there are some tips that you can follow for a smooth and clean cut, there are some mistakes that you should avoid so that you don’t make a costly and messy blunder during the cutting process.
- Cutting face-up with a circular saw. The most common laminate cutting mistake. Chipout on the finished surface can’t be repaired. Always flip the countertop face down for circular saw cuts.
- Using the wrong blade. A standard wood-cutting blade with large, aggressive teeth will chip laminate badly. Fine-tooth, carbide-tipped blades are what the material requires.
- Rushing the feed rate. Pushing the saw or jigsaw faster than the blade can comfortably cut causes the blade to flex, wander, and tear the laminate rather than shear it.
- Skipping the guide. Even experienced woodworkers don’t cut long straight lines freehand reliably. Clamp a straightedge and use it.
- Not supporting the offcut. Worth repeating because it causes so many ruined cuts. The offcut needs to be supported right up until the very end of the cut.
When to Call a Professional
Most laminate countertop cuts are well within DIY territory. However, there are some situations where you should always call in a professional and let them handle it.
Here are some examples of situations that require a professional.
- Mitered corner joints on the L-shaped countertop runs. A miter cut on laminate needs to be precise to within a fraction of a degree, or the joint will be visible and won’t close properly. This usually requires a track saw or a table saw with a high-quality fence.
- Post-form countertops with scribing requirements. If the wall behind the countertop is uneven, the backsplash needs to be scribed to fit. It’s a time-consuming freehand process that requires experience to do well.
- Countertops with complex cutout geometry, such as integrated cooktop cutouts with tight corners or irregular shapes that are difficult to template accurately.
The Sink Makes the Countertop
A laminate countertop is only as functional as what goes in it. The sink cutout is often the most involved part of the whole installation, and it needs to be right, because there’s no easy way to fix a cutout that’s off by half an inch.
Ruvati kitchen sinks come with a cutout template included, which takes the guesswork out of marking the opening in your countertop. The template is sized and shaped to match the sink exactly. You trace it, cut it, and the sink drops in cleanly.